이 아티클은 언리얼 엔진을 파악해 가는 단계에 계신 독자를 위해 풀어 쓰여진 글입니다. 직관적이고 쉬운 전달을 위해 풀어 쓰는 과정을 거치다보니, 일부 전달이 매끄럽지 못한 부분이 있을 수 있습니다. 이해가 어렵거나 잘못된 내용을 발견하시면 다음 독자를 위해 한 말씀 부탁드립니다.
감사합니다.
서론
언리얼 엔진은 수 백개가 넘는 수의 모듈로 구성되어 있습니다. 언리얼 엔진은 왜 이렇게 많은 수의 모듈로 분리하여 엔진을 관리하고 있을까요?
모듈 형태로 코드를 관리하는 전략은 수 많은 장단점을 갖고 있겠지만, 언리얼 엔진이 주목했을 것으로 보이는 장점은 다음과 같습니다.
- 컴파일과 링킹에 소요되는 시간 절약
- 사용할 모듈만 배포하여 필요한 사이즈의 바이너리 생성
- 런타임에서 필요할 때 동적으로 적재 가능
- 간편한 코드 재사용
- 캡슐화와 클래스 구조화 용이함
언리얼 모듈
모듈은 /Source 하위 경로에 모듈 이름으로 된 폴더와, 모듈 규칙을 정의한 *.build.cs 스크립트 파일로 구성됩니다. 엔진을 사용하면서 크게 3가지 정도 위치에서 모듈 구조를 확인할 수 있습니다.
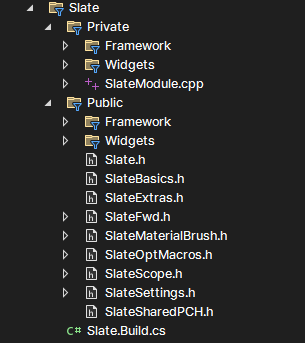
- 엔진 소스 내 모듈 (ex. UE5/Engine/Source/Runtime/Slate)
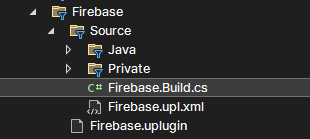
- 플러그인 내 모듈 (ex. UE5/Engine/Plugins/Runtime/Firebase)
- 게임 프로젝트 내 모듈 (ex. ShooterGame/Source/ShooterGame)


*.Build.cs
모듈이름.Build.cs 파일에서는 이 모듈이 어떤 종속성을 갖고 있고, 모듈이 어떻게 컴파일 및 빌드될 지 규칙을 결정해 줄 수 있습니다. 클래스의 기본형을 살펴본 다음, 자주 사용되는 규칙에 대해 다루어 보겠습니다.
실습을 위해 SkidMark라는 이름의 Vehicle 예제 프로젝트를 생성했습니다.
미리 지정된 템플릿으로 생성된 SkidMark.Build.cs를 살펴보겠습니다.
// Copyright Epic Games, Inc. All Rights Reserved.

using UnrealBuildTool;

// #1. ModuleRules를 상속받아 SkidMark 모듈 규칙을 지정할 클래스 정의
public class SkidMark : ModuleRules
{
    // #2. 부모 클래스의 생성자를 계승
    public SkidMark(ReadOnlyTargetRules Target) : base(Target)
    {
        // #3. 모듈의 빌드 전략 지정
        PCHUsage = PCHUsageMode.UseExplicitOrSharedPCHs;
        DefaultBuildSettings = BuildSettingsVersion.V2;

        // #4. 모듈의 종속성을 지정
        PublicDependencyModuleNames.AddRange(new string[]
        {
            "Core",
            "CoreUObject",
            "Engine",
            "InputCore",
            "ChaosVehicles",
            "HeadMountedDisplay",
            "PhysicsCore"
        });

        // #5. 모듈에 DefineConstants를 추가
        PublicDefinitions.Add("HMD_MODULE_INCLUDED=1");
    }
}
#1.
ModuleRules 클래스를 상속받아 모듈 설정을 C# 스크립트에서 지정할 수 있는 클래스를 정의합니다.
부모 클래스인 ModuleRules의 정의는 Engine/Programs/UnrealBuildTool/Configuration/ModuleRules.cs 에서 확인할 수 있습니다. Build.cs에서 사용되는 자료형들과 데이터 객체가 정의되어 있습니다.
#2.
파생 클래스의 생성자에서는 ModuleRules의 생성자를 호출해주고, SkidMark 모듈에서 사용할 옵션을 생성자 내에서 지정합니다. 이 생성자는 UnrealBuildTool에 의해 Reflection으로 Invoke 되어 호출됩니다.
부모 클래스의 생성자를 필수적으로 호출하게 되어 있지만, ModuleRules 클래스의 생성자는 별도로 큰 역할을 수행 하지는 않습니다.
/// <summary>
/// Constructor. For backwards compatibility while the parameterless constructor is being phased out, initialization which would happen here is done by
/// RulesAssembly.CreateModulRules instead.
/// </summary>
/// <param name="Target">Rules for building this target</param>
public ModuleRules(ReadOnlyTargetRules Target)
{
    this.Target = Target;
}
Target 객체를 ModuleRules의 멤버 변수로 저장해 주는 정도의 작업만 진행합니다.
#3.
모듈이 어떤 형태로 빌드될 지 여러가지 설정을 지정합니다.
PCHUsage는 PrecompiledHeader에 관련된 옵션, DefaultBuildSettings는 IncludePath와 PCH에 관해 언리얼 엔진 버전 별로 상이한 프리셋을 버전 호환이 가능하도록 추가된 옵션입니다. 이 값들은 언리얼 엔진에 입문하는데 치명적인 영향을 주진 않아서, 궁금하다면 어떤 역할을 하는 지 코드를 따라가 보시면 됩니다. 모듈 룰을 상세하게 정의하고 다루어야 하는 단계가 아니라면, '이런게 있구나' 정도로만 알고 넘어가도 무방합니다.
#4.
이 모듈에서 사용할 다른 모듈 이름을 지정합니다. 여기에 항목을 추가해야만 다른 모듈의 클래스나 함수를 참조해 사용할 수 있게 됩니다. 일반적인 경우에는 서로 다른 두 모듈이 서로를 참조하지 않도록 권장하고 있습니다. (Circular Reference) 불가피하게 상호 참조가 필요한 경우에는 CircularlyReferencedDependentModules에 모듈 이름을 추가하여 상호 참조 허용 리스트를 관리할 수 있습니다.
/// <summary>
/// Only for legacy reason, should not be used in new code. List of module dependencies that should be treated as circular references.  This modules must have already been added to
/// either the public or private dependent module list.
/// </summary>
public List<string> CircularlyReferencedDependentModules = new List<string>();
#5.
모듈에서 사용할 상수를 정의합니다.
SkidMark.Build.cs에서 HMD_MODULE_INCLUDED=1로 정의되었고, 모듈에서는 컴파일 타임에 결정되는 이 값을 활용할 수 있습니다.
#if HMD_MODULE_INCLUDED
// activated scope!
static_assert(false, "HMD_INCLUDED!");
#else
// inactivated scope... ;(
static_assert(false, "HMD_NOT_INCLUDED");
#endif
전처리기에 사용되거나, 필요한 상수 값을 지정하여 사용할 수 있습니다.
자주 사용되는 모듈 규칙
플랫폼 분기
모듈이 빌드되는 타겟의 플랫폼을 참조하여, 플랫폼 별로 필요한 작업을 처리합니다.
다른 모듈 종속성을 추가하거나, DefineConstants를 추가하거나, 로그를 남기는 처리를 수행합니다.
bool bIsMobilePlatform = Target.Platform.IsInGroup(UnrealPlatformGroup.Android)
                         || Target.Platform.IsInGroup(UnrealPlatformGroup.IOS);

if (Target.Platform.IsInGroup(UnrealPlatformGroup.Desktop))
{
    PrivateDependencyModuleNames.Add("D3D11RHI");
    PrivateDependencyModuleNames.Add("D3D12RHI");
}
else if (bIsMobilePlatform)
{
}

if (Target.Platform == UnrealTargetPlatform.Mac)
{
    PrivateDependencyModuleNames.Add("MetalRHI");
}
코드 최적화 수준 지정
종종 디버깅 중 중단점이 제대로 걸리지 않는 코드들이 생길 수 있습니다. 보통은 Code Optimization이 들어가면서 최적화 되어 버린 코드가 존재해서 그럴 때가 있는데요. 초기 개발 단계에서는 일반적으로 에디터 환경에 디버깅 상태로 테스트를 진행하게 되어 작업하는 모듈에 대해 코드 최적화를 수행하지 않도록 지정하곤 합니다.
if (Target.bBuildEditor)
{
    OptimizeCode = CodeOptimization.Never;
}
라이브러리 선택
// in Engine/Source/Runtime/Online/WebSockets/WebSockets.Build.cs

protected virtual bool bPlatformSupportsWinHttpWebSockets
{
    get
    {
        // Availability requires Windows 8.1 or greater, as this is the min version of WinHttp that supports WebSockets
        return Target.Platform.IsInGroup(UnrealPlatformGroup.Windows) && Target.WindowsPlatform.TargetWindowsVersion >= 0x0603;
    }
}

...

if (ShouldUseModule)
{
    bWithWebSockets = true;

    if (PlatformSupportsLibWebsockets)
    {
        bWithLibWebSockets = true;

        if (UsePlatformSSL)
        {
            PrivateDefinitions.Add("WITH_SSL=0");
            AddEngineThirdPartyPrivateStaticDependencies(Target, "libWebSockets");
        }
        else
        {
            AddEngineThirdPartyPrivateStaticDependencies(Target, "OpenSSL", "libWebSockets", "zlib");
            PrivateDependencyModuleNames.Add("SSL");
        }
    }
    else if (bPlatformSupportsWinHttpWebSockets)
    {
        // Enable WinHttp Support
        bWithWinHttpWebSockets = true;

        AddEngineThirdPartyPrivateStaticDependencies(Target, "WinHttp");

        // We need to access the WinHttp folder in HTTP
        PrivateIncludePaths.AddRange(
            new string[] {
                "Runtime/Online/HTTP/Private",
            }
        );
    }
}

PublicDefinitions.Add("WEBSOCKETS_PACKAGE=1");
PublicDefinitions.Add("WITH_WEBSOCKETS=" + (bWithWebSockets ? "1" : "0"));
PublicDefinitions.Add("WITH_LIBWEBSOCKETS=" + (bWithLibWebSockets ? "1" : "0"));
PublicDefinitions.Add("WITH_WINHTTPWEBSOCKETS=" + (bWithWinHttpWebSockets ? "1" : "0"));
bPlatformSupportsWinHttpWebSockets와 같은 프로퍼티에서 특정한 라이브러리를 사용할 수 있는 환경인지 판단한 후, 필요한 종속성을 추가합니다. 그리고, PublicDefinitions에도 어떤 라이브러리가 추가되었는지 기록하여 모듈 내 헤더와 소스 파일에서 컴파일 타임 분기로 처리할 수 있게 장치합니다.
솔루션에서 위 전처리기를 검색해서 확인하면, 모듈의 컴파일 시점에 어떤 라이브러리를 사용할지 결정하여 코드가 활성화 되는 모습을 직접 확인하실 수 있습니다.

모듈 구현체
모듈 규칙을 정의하고 사용되는 방식을 살펴봅니다.
위에서 *.Build.cs 파일로 모듈의 속성을 지정하는 방법에 대해 알아보았다면, 이번에는 모듈의 Entrypoint와 Endpoint를 탐구해보겠습니다. 엔진이 만들어주는 템플릿 모듈을 살펴보기 위해서, 빈 플러그인을 하나 생성해보겠습니다.
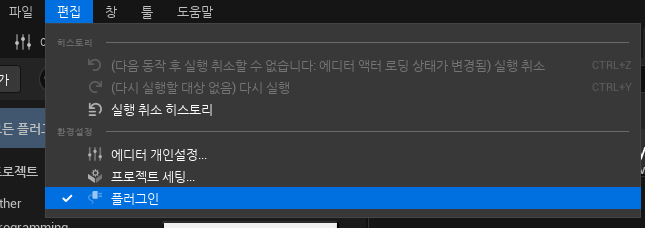
- 상단 메뉴의 편집 > 플러그인 메뉴를 선택해 플러그인 독립형 에디터 윈도우를 띄웁니다.
- 새 플러그인 버튼을 눌러, 생성 가능한 플러그인 리스트 중 '공백' 항목을 선택하여 원하는 이름을 지정합니다.
- 엔진이 컴파일되고 프로젝트 파일 재생성이 끝나면, 솔루션 탐색기에서 플러그인을 확인할 수 있습니다.


솔루션 탐색기에는 플러그인이름.Build.cs, 플러그인이름.h, 플러그인이름.cpp 총 파일 3개가 생성됩니다.

모듈의 기본 템플릿은 IModuleInterface 추상 클래스를 상속받고, 2개의 가상 함수를 구현하도록 생성됩니다.
// Copyright Epic Games, Inc. All Rights Reserved.

#pragma once

#include "CoreMinimal.h"
#include "Modules/ModuleManager.h"

class FSpeedMeterModule : public IModuleInterface
{
public:

    /** IModuleInterface implementation */
    virtual void StartupModule() override;
    virtual void ShutdownModule() override;
};// Copyright Epic Games, Inc. All Rights Reserved.
#include "SpeedMeter.h"
#define LOCTEXT_NAMESPACE "FSpeedMeterModule"
class FSpeedStatCollector : public FNoncopyable
{
int32 Count = 0;
public:
void BeginProfile()
{
Count++;
}
void EndProfile()
{
Count--;
}
void Report() const
{
// Upload Count
if (Count > 0)
{
// ...
}
}
};
void FSpeedMeterModule::StartupModule()
{
// This code will execute after your module is loaded into memory; the exact timing is specified in the .uplugin file per-module
this->Collector = MakeUnique<FSpeedStatCollector>();
this->Collector->BeginProfile();
}
void FSpeedMeterModule::ShutdownModule()
{
// This function may be called during shutdown to clean up your module. For modules that support dynamic reloading,
// we call this function before unloading the module.
this->Collector->EndProfile();
this->Collector->Report();
this->Collector.Reset();
}
#undef LOCTEXT_NAMESPACE
IMPLEMENT_MODULE(FSpeedMeterModule, SpeedMeter)
모듈이 로드되면 속도계 프로파일링을 시작하고, 모듈이 언로드 될 때 속도계 데이터 기록을 멈추고 리포트하는 의사 코드입니다. 이런 형태로 모듈에서 사용했던 자원을 필요한 만큼 할당하거나, 반환 할 때 사용됩니다. 또 다른 의존성을 가진 모듈을 참조하여 로드시키는 작업을 수행하기도 합니다.
다른 모듈 로드하기
C++ 영역에서 다른 모듈을 로드하여 사용할 수 있습니다.
ModuleManager라는 클래스를 통해서 처리할 수 있는데요, 이렇게 로드된 모듈의 경우에도 StartupModule이나 기타 IModuleInterface에 정의된 특정 함수들이 호출됩니다.
SpeedMeter 플러그인 하위에 GasMeter라는 모듈을 추가하고, SpeedMeter 모듈에서 로드하여 사용해보겠습니다.
플러그인에 GasMeter 모듈을 추가하는 작업은 다음 토픽에서 플러그인에 모듈 정의를 추가하는 부분이 병행 되어야 하므로, 코드만 추가해서는 기대하는 대로 동작하지 않을 것입니다.
편의상 GasMeter 모듈의 구현은 간단하게 로그를 찍는 정도로만 갈음하겠습니다.
// Private/GasMeter.cpp
// Copyright Epic Games, Inc. All Rights Reserved.

#include "GasMeter.h"

DEFINE_LOG_CATEGORY_STATIC(LogGasMeter, Log, All);

#define LOCTEXT_NAMESPACE "FGasMeterModule"

void FGasMeterModule::StartupModule()
{
    UE_LOG(LogGasMeter, Log, TEXT("GasMeter module has started!"));
}

void FGasMeterModule::ShutdownModule()
{
    UE_LOG(LogGasMeter, Log, TEXT("GasMeter module has shut down"));
}

#undef LOCTEXT_NAMESPACE

IMPLEMENT_MODULE(FGasMeterModule, GasMeter)
SpeedMeter의 StartupModule에서 GasMeter 모듈을 로드합니다.
실행 커맨드라인 인수에 -UseGasMeter가 포함된 경우에만 로드하도록 조건문을 지정했습니다.
// SpeedMeter.cpp

void FSpeedMeterModule::StartupModule()
{
    UE_LOG(LogSpeedMeter, Log, TEXT("SpeedMeter module has started!"));

    // This code will execute after your module is loaded into memory; the exact timing is specified in the .uplugin file per-module

    this->Collector = MakeUnique<FSpeedStatCollector>();
    this->Collector->BeginProfile();

    if (FParse::Param(FCommandLine::Get(), TEXT("UseGasMeter")))
    {
        // we need to load gas meter module.
        IModuleInterface GasMeter = FModuleManager::Get().LoadModuleChecked(TEXT("GasMeter"));
    }
}

void FSpeedMeterModule::ShutdownModule()
{
    if (FModuleManager::Get().IsModuleLoaded(TEXT("GasMeter")))
    {
        FModuleManager::Get().UnloadModule(TEXT("GasMeter"));
    }

    UE_LOG(LogSpeedMeter, Log, TEXT("SpeedMeter module has shut down"));

    // This function may be called during shutdown to clean up your module.  For modules that support dynamic reloading,
    // we call this function before unloading the module.

    this->Collector->EndProfile();
    this->Collector->Report();
    this->Collector.Reset();
}
-UseGasMeter 파라미터가 없으면, 모듈을 로드 하지 않아 SpeedMeter 로드 로그만 출력됩니다.
[2023.02.15-15.46.31:268][  0]LogUProjectInfo: Found projects:
[2023.02.15-15.46.31:718][  0]LogOpenImageDenoise: OIDN starting up
[2023.02.15-15.46.31:773][  0]LogSpeedMeter: SpeedMeter module has started!
[2023.02.15-15.46.31:917][  0]LogUObjectArray: 31593 objects as part of root set at end of initial load.
IDE의 Configuration에서 -UseGasMeter 파라미터를 추가해주고 다시 테스트를 수행합니다.

LogSpeedMeter 로그 아래에서 LogGasMeter 로그를 확인할 수 있습니다.
[2023.02.15-15.49.42:387][  0]LogUProjectInfo: Found projects:
[2023.02.15-15.49.42:427][  0]LogSpeedMeter: SpeedMeter module has started!
[2023.02.15-15.49.42:463][  0]LogGasMeter: GasMeter module has started!
[2023.02.15-15.49.42:595][  0]LogUObjectArray: 31593 objects as part of root set at end of initial load.
이렇게 C++ 코드로 직접 모듈을 로드 및 언로드를 수행 실습을 마쳤습니다.
모듈 디스크립터
그런데, 모든 모듈은 플러그인 또는 프로젝트에 종속되어 있습니다. 또한 플러그인과 프로젝트는 어떤 모듈이 어떤 약속된 시점에 로딩이 진행될 지 미리 결정해서 정의해 놓고 있습니다. 위에서 제작한 SpeedMeter 플러그인의 Descriptor를 보면서 확인해 보겠습니다.
SpeedMeter.uplugin 파일을 편하게 사용하는 TextEditor 또는 IDE에서 열어 내용을 확인합니다.
{
	"FileVersion": 3,
	"Version": 1,
	"VersionName": "1.0",
	"FriendlyName": "SpeedMeter",
	"Description": "",
	"Category": "Other",
	"CreatedBy": "",
	"CreatedByURL": "",
	"DocsURL": "",
	"MarketplaceURL": "",
	"SupportURL": "",
	"CanContainContent": true,
	"IsBetaVersion": false,
	"IsExperimentalVersion": false,
	"Installed": false,
	"Modules": [
		{
			"Name": "SpeedMeter",
			"Type": "Runtime",
			"LoadingPhase": "Default"
		}
	]
}
별도로 수정을 하지 않았다면, 위와 같은 플러그인 정의를 확인할 수 있습니다. 이 정의에는 배열 타입의 Modules 필드가 포함되어 있고, 여기에 소속된 모듈들을 정의함으로써 엔진이 인식하고 코드레벨에서 접근할 수 있는 상태가 됩니다.
이전 단계인 코드에서 모듈을 로드하는 실습시에도 GasMeter 모듈을 임의로 추가하여야만 실습이 가능했을 것입니다. 따라서 아래와 같은 모습으로 수정하게 됩니다.
{
	"FileVersion": 3,
	"Version": 1,
	"VersionName": "1.0",
	"FriendlyName": "SpeedMeter",
	"Description": "",
	"Category": "Other",
	"CreatedBy": "",
	"CreatedByURL": "",
	"DocsURL": "",
	"MarketplaceURL": "",
	"SupportURL": "",
	"CanContainContent": true,
	"IsBetaVersion": false,
	"IsExperimentalVersion": false,
	"Installed": false,
	"EnabledByDefault": true,
	"Modules": [
		{
			"Name": "SpeedMeter",
			"Type": "Runtime",
			"LoadingPhase": "Default"
		},
		{
			"Name": "GasMeter",
			"Type": "Runtime",
			"LoadingPhase": "None"
		}
	]
}
Modules 하위 항목들의 필드인 Type과 LoadingPhase가 어떤 역할을 하는지는 공식 문서와 코드를 참고하시면 됩니다.
언리얼 엔진 공식 문서: https://docs.unrealengine.com/4.27/en-US/ProgrammingAndScripting/ProgrammingWithCPP/Modules/
Unreal Engine Modules
Modules are the building blocks of Unreal Engine's software architecture. You can organize your code into modules to create more efficient and maintainable projects.
docs.unrealengine.com
모듈 디스크립터 소스 코드:
Engine\Source\Runtime\Projects\Public\ModuleDescriptor.h
LoadingPhase
namespace ELoadingPhase
{
	enum Type
	{
		/** As soon as possible - in other words, uplugin files are loadable from a pak file (as well as right after PlatformFile is set up in case pak files aren't used) Used for plugins needed to read files (compression formats, etc) */
		EarliestPossible,

		/** Loaded before the engine is fully initialized, immediately after the config system has been initialized.  Necessary only for very low-level hooks */
		PostConfigInit,

		/** The first screen to be rendered after system splash screen */
		PostSplashScreen,

		/** Loaded before coreUObject for setting up manual loading screens, used for our chunk patching system */
		PreEarlyLoadingScreen,

		/** Loaded before the engine is fully initialized for modules that need to hook into the loading screen before it triggers */
		PreLoadingScreen,

		/** Right before the default phase */
		PreDefault,

		/** Loaded at the default loading point during startup (during engine init, after game modules are loaded.) */
		Default,

		/** Right after the default phase */
		PostDefault,

		/** After the engine has been initialized */
		PostEngineInit,

		/** Do not automatically load this module */
		None,

		// NOTE: If you add a new value, make sure to update the ToString() method below!
		Max
	};

    // ...
}
기본 설정은 Default이고, 다른 타이밍은 지정된 순서에 따라 로딩됩니다. 엔진의 초기화 시점이나 로딩 시점 등 여러 타이밍이 존재하고 필요에 따라 선택할 수 있습니다.
None을 선택하는 경우 엔진의 타이밍에 의해서는 로드되지 않고, C++ 코드에 의해서만 로드됩니다.
위 예제 플러그인에서는 GasMeter를 None으로 두고, 실행시에 프로세스로 넘어오는 커맨드라인 인수를 이용해서 해당 모듈을 로드할지의 여부를 결정하였었습니다.
Type
모듈이 로드 될 수 있는 HostType을 의미합니다. 일반적인 게임 및 에디터 환경은 Runtime, 에디터 환경에서만 로드되어야 하면 Editor를 지정합니다. 필요에 따라 ClientOnly, ServerOnly 등 다양한 옵션을 사용합니다.
namespace EHostType
{
	enum Type
	{
		// Loads on all targets, except programs.
		Runtime,

		// Loads on all targets, except programs and the editor running commandlets.
		RuntimeNoCommandlet,

		// Loads on all targets, including supported programs.
		RuntimeAndProgram,

		// Loads only in cooked games.
		CookedOnly,

		// Only loads in uncooked games.
		UncookedOnly,

		// Deprecated due to ambiguities. Only loads in editor and program targets, but loads in any editor mode (eg. -game, -server).
		// Use UncookedOnly for the same behavior (eg. for editor blueprint nodes needed in uncooked games), or DeveloperTool for modules
		// that can also be loaded in cooked games but should not be shipped (eg. debugging utilities).
		Developer,

		// Loads on any targets where bBuildDeveloperTools is enabled.
		DeveloperTool,

		// Loads only when the editor is starting up.
		Editor,

		// Loads only when the editor is starting up, but not in commandlet mode.
		EditorNoCommandlet,

		// Loads only on editor and program targets
		EditorAndProgram,

		// Only loads on program targets.
		Program,

		// Loads on all targets except dedicated clients.
		ServerOnly,

		// Loads on all targets except dedicated servers.
		ClientOnly,

		// Loads in editor and client but not in commandlets.
		ClientOnlyNoCommandlet,

		//~ NOTE: If you add a new value, make sure to update the ToString() method below!
		Max
	};

    // ...
};
다른 모듈 사용 하기
위에서는 다른 모듈을 로드하고 언로드하는 방법과 조건을 확인했습니다. 모듈이 로드되면, 해당 모듈에 포함된 코드를 직접 호출하거나 자료형을 include하여 사용할 수 있게 됩니다. 모든 자료형에 대해서 외부로 공개되는 것은 아니며, 몇 가지 제약사항이 존재합니다. 클래스의 일부 메소드만 공개적으로 노출하는 등의 세부적인 관리도 가능합니다.
공개 API 선언
다른 모듈에서 현재 모듈의 코드를 사용하기 위해서는 공개적인 헤더와, 링크가 가능한 상태로 지정해야 합니다. 언리얼 엔진에서는 정상적으로 모듈이 정의되면, 공개 API 선언을 위한 매크로를 제공합니다.
포맷은 ${모듈이름}_API 이고, 외부에서 사용해야 하는 클래스는 이 매크로를 클래스 선언시에 추가하여야 합니다. 남은 연료를 나타낼 수 있는 간단한 클래스를 하나 정의하고, 외부에서 사용할 수 있도록 장치해보겠습니다.
#pragma once

#include "CoreMinimal.h"

class GASMETER_API FFuel
{
    int32 MaxCapacity;
    int32 CurrentValue;

public:
    UE_NONCOPYABLE(FFuel);

    explicit FFuel(const int32& InMaxCapacity) : MaxCapacity(InMaxCapacity), CurrentValue(0)
    {
    }

    int32 GetMaxCapacity() const
    {
        return MaxCapacity;
    }

    int32 GetCurrentValue() const
    {
        return CurrentValue;
    }

    float GetRemainRatio() const
    {
        return static_cast<float>(CurrentValue) / static_cast<float>(MaxCapacity);
    }

    void Fill(const int32& InValue)
    {
        CurrentValue += InValue;
        CurrentValue = CurrentValue > MaxCapacity ? MaxCapacity : CurrentValue;
    }

    bool IsFull() const
    {
        return CurrentValue == MaxCapacity;
    }
};
눈치채셨을지 모르겠지만, GASMETER_API가 클래스 정의에 선언되었습니다.
Intermediate 내에 생성된 모듈의 GasMeter.Definitions.cs 임시 파일을 확인하면, GASMETER_API는 DLLEXPORT로 정의되어 있는 모습을 확인 할 수 있습니다.

사용하는 모듈에서의 구현
가장 먼저, 모듈 규칙 정의 스크립트에서 모듈 종속성을 추가해야 합니다.
PublicDependencyModuleNames.AddRange(
    new string[]
    {
        "Core",
        "GasMeter"
        // ... add other public dependencies that you statically link with here ...
    }
);
SpeedMeter.Build.cs에서 GasMeter 모듈을 종속성 모듈 리스트에 추가하였습니다.
그 후로는, 헤더를 인클루드하고 구현된 코드를 사용하면 이슈 없이 코드 호출이 가능합니다.
SpeedMeter 모듈이 관리하는 Fuel 클래스에 액세스하는 예제 코드를 작성하였습니다.
void FSpeedMeterModule::StartupModule()
{
    UE_LOG(LogSpeedMeter, Log, TEXT("SpeedMeter module has started!"));

    // This code will execute after your module is loaded into memory; the exact timing is specified in the .uplugin file per-module

    this->Collector = MakeUnique<FSpeedStatCollector>();
    this->Collector->BeginProfile();

    if (FParse::Param(FCommandLine::Get(), TEXT("UseGasMeter")))
    {
        // we need to load gas meter module.
        IModuleInterface* GasMeter = FModuleManager::Get().LoadModule(TEXT("GasMeter"));

        // 1)
        {
            if (FGasMeterModule* GasMeterModule = static_cast<FGasMeterModule*>(GasMeter))
            {
                const TSharedRef<FFuel> FuelManager = GasMeterModule->GetFuel();
                FuelManager.Get().Fill(28);
            }
        }

        // 2)
        {
            const TSharedPtr<FFuel> FuelInstance = MakeShareable(new FFuel(20));
            FuelInstance->Fill(16);

            if (FuelInstance->IsFull())
            {
                // yes!
            }
        }
    }
}
형변환 코드가 들어갔지만, 다른 모듈의 코드를 사용하기 위해 형변환이 필수적인 것은 아닙니다.
그저 1)과 같은 경우에는 Fuel 객체를 모듈이 멤버 변수로 관리하고 있기 때문에, 모듈을 통해 접근하였습니다. 필요하다면 2)처럼 직접 Fuel 객체의 인스턴스를 생성하더라도 무방합니다.
공개 API 선언 디테일
UCLASS는?
UCLASS() 매크로를 사용하는 클래스에서는 minimal api 키워드를 추가함으로써, 필수 요소에 대해서만 export 처리를 진행할 수 있습니다.
GasMeter 모듈에 액터 클래스를 상속받은 Barrel 클래스를 정의했습니다. UCLASS 매크로에는 MinimalAPI를 추가합니다.
#pragma once

#include "CoreMinimal.h"
#include "GameFramework/Actor.h"
#include "Barrel.generated.h"

UCLASS(MinimalAPI)
class ABarrel final : public AActor
{
    GENERATED_BODY()
};
이 경우, ABarrel 클래스는 외부 모듈에서 상속, 형변환, 인라인 함수 사용만 가능합니다.
이 상태에서 추가적으로 함수를 공개 처리하고 싶으면, MODULENAME_API 를 선언하여 Export 가능합니다.
#pragma once

#include "CoreMinimal.h"
#include "GameFramework/Actor.h"
#include "Barrel.generated.h"

UCLASS(MinimalAPI)
class ABarrel final : public AActor
{
    GENERATED_BODY()

public:
    UFUNCTION()
    GASMETER_API void Explode();
};
클래스 전체를 Export 하기 위해서는 일반 Pure 클래스와 마찬가지로, MODULENAME_API 를 클래스 정의에 선언하여 전체 API를 노출시킬 수 있습니다.
globalnamespace는?
global namespace에 정의되는 enum, class, function들 역시 마찬가지로 MODULENAME_API를 사용하여 노출시킬 수 있습니다.
namespace DataHost
{
  enum Type { None, Game, Plugin, Server, Max };
  GASMETER_API FString ToString(const Type& InType);
}
마무리
정리
언리얼 모듈은 코드의 격리 및 필요할 때 로드하여 사용하는 등 개발에 용이함을 위해 고안된 패턴
모듈에서 선택적으로 공개할 API를 결정하고, 모듈 간 종속성을 지정하여 다른 모듈에서의 코드를 재사용 할 수 있음
모듈에 대해 알아보았습니다.
디테일한 부분은 다음 글에서 확인해 보도록 하겠습니다.
'Unreal > Articles' 카테고리의 다른 글
| 언리얼: 튜링 메시 셰이더 블로그 번역 (0) | 2021.06.01 |
|---|---|
| 언리얼: 에인션트의 협곡 골렘 구현 방식 간단 살펴보기 (0) | 2021.05.31 |
| 언리얼: 루멘 기술 개요 한국어 번역 (0) | 2021.05.31 |
| 언리얼: 언리얼 엔진 5 개인 공부 자료 및 해석 (0) | 2021.05.31 |
| 언리얼: 메타 휴먼 크리에이터 EA 신청 및 소스 파일 다운로드(MAYA) (1) | 2021.05.31 |


